There are multiple ways from which you can easily flash custom ROMs, add rooting privileges, enhance performance, and increase battery life. For all of those perks, installing a TWRP recovery would be an initial step.
For those who didn’t know, it’s a custom recovery, which is used for installing third-party apps directly on your Android device firmware.
In this post, we will cover the entire guide to installing TWRP recovery on Samsung Galaxy S24 Ultra in a hassle-free manner.
Through this recovery, it’s possible to create a personalized interface using custom ROM and magisk modules.
Furthermore, you will also obtain options like complete firmware backup and applying advanced customization. Now, let’s get started with the installation process of this fascinating tool.
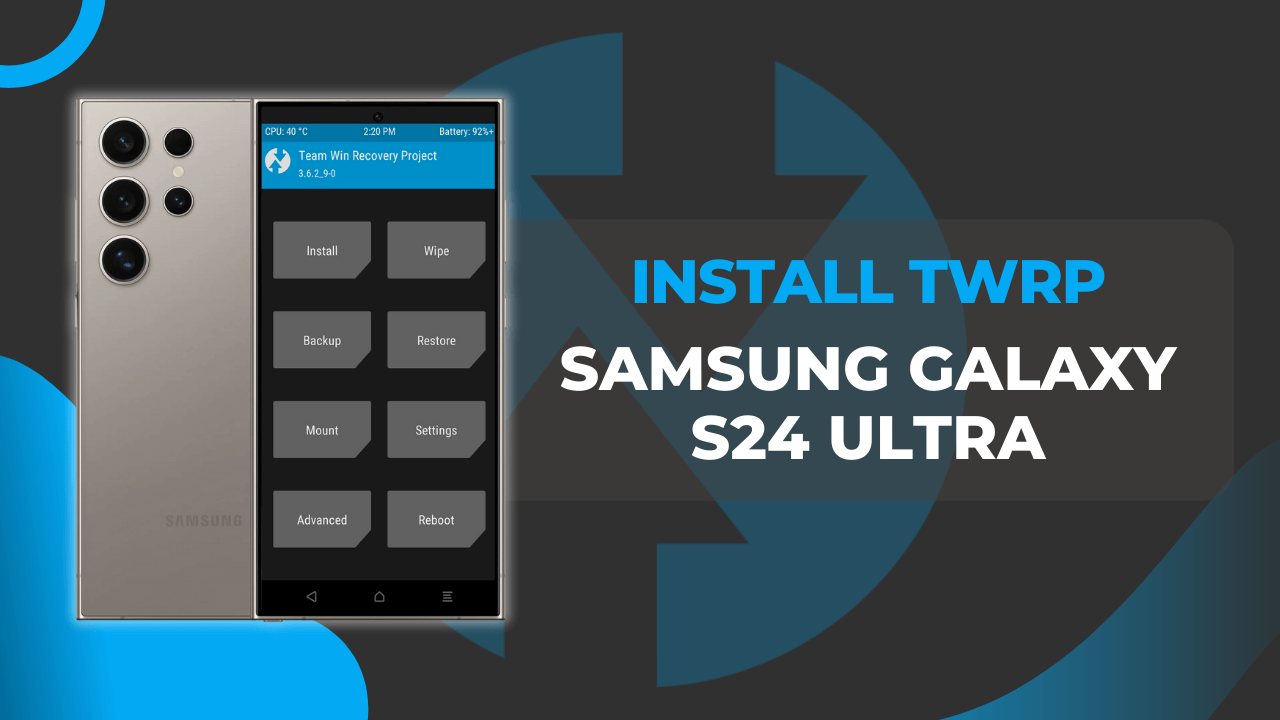
Table of Contents
Basic Preparation to Install TWRP on Samsung Galaxy S24 Ultra
As a thumb rule, the preparation for TWRP custom recovery installation on Samsung Galaxy S24 Ultra will include complete Android backup, accessing developer mode, and unlocking the bootloader.
These are the primary requirements that you need to complete before proceeding with the installation guide.
But, there are a handful of things that you need to remember before you start the process, so let’s take a look at the pre-requirements!
Things Need To Remember
- Firstly, ensure that your device is 100% fueled.
- Remove your Google/Samsung Account from your phone.
- Create a full backup of your Galaxy S24 Ultra device.
- Keep your Samsung Galaxy S24 Ultra USB cable ready.
- Download the Odin tool on your PC for the upcoming process.
Unlock the Bootloader on Samsung Galaxy S24 Ultra
In this part, we will walk through the entire process to unlock the bootloader of your Samsung device. The bootloader is an entry-level software used to boot up your Android device.
Generally, if you unlock those system settings, installing custom ROMs and rooting your device would become possible.
Long story short, you can apply modifications to the software according to your needs, and installing TWRP recovery is one of the privileges that you will unlock during the procedure.
Though, it might look like a daunting task. But if you follow the subsequent steps, installing custom recovery won’t be a hassle.
Video Tutorial
Enable the Developer Options on Samsung Galaxy S24 Ultra
Here are the complete instructions to unlock the developer settings of your Samsung phone!
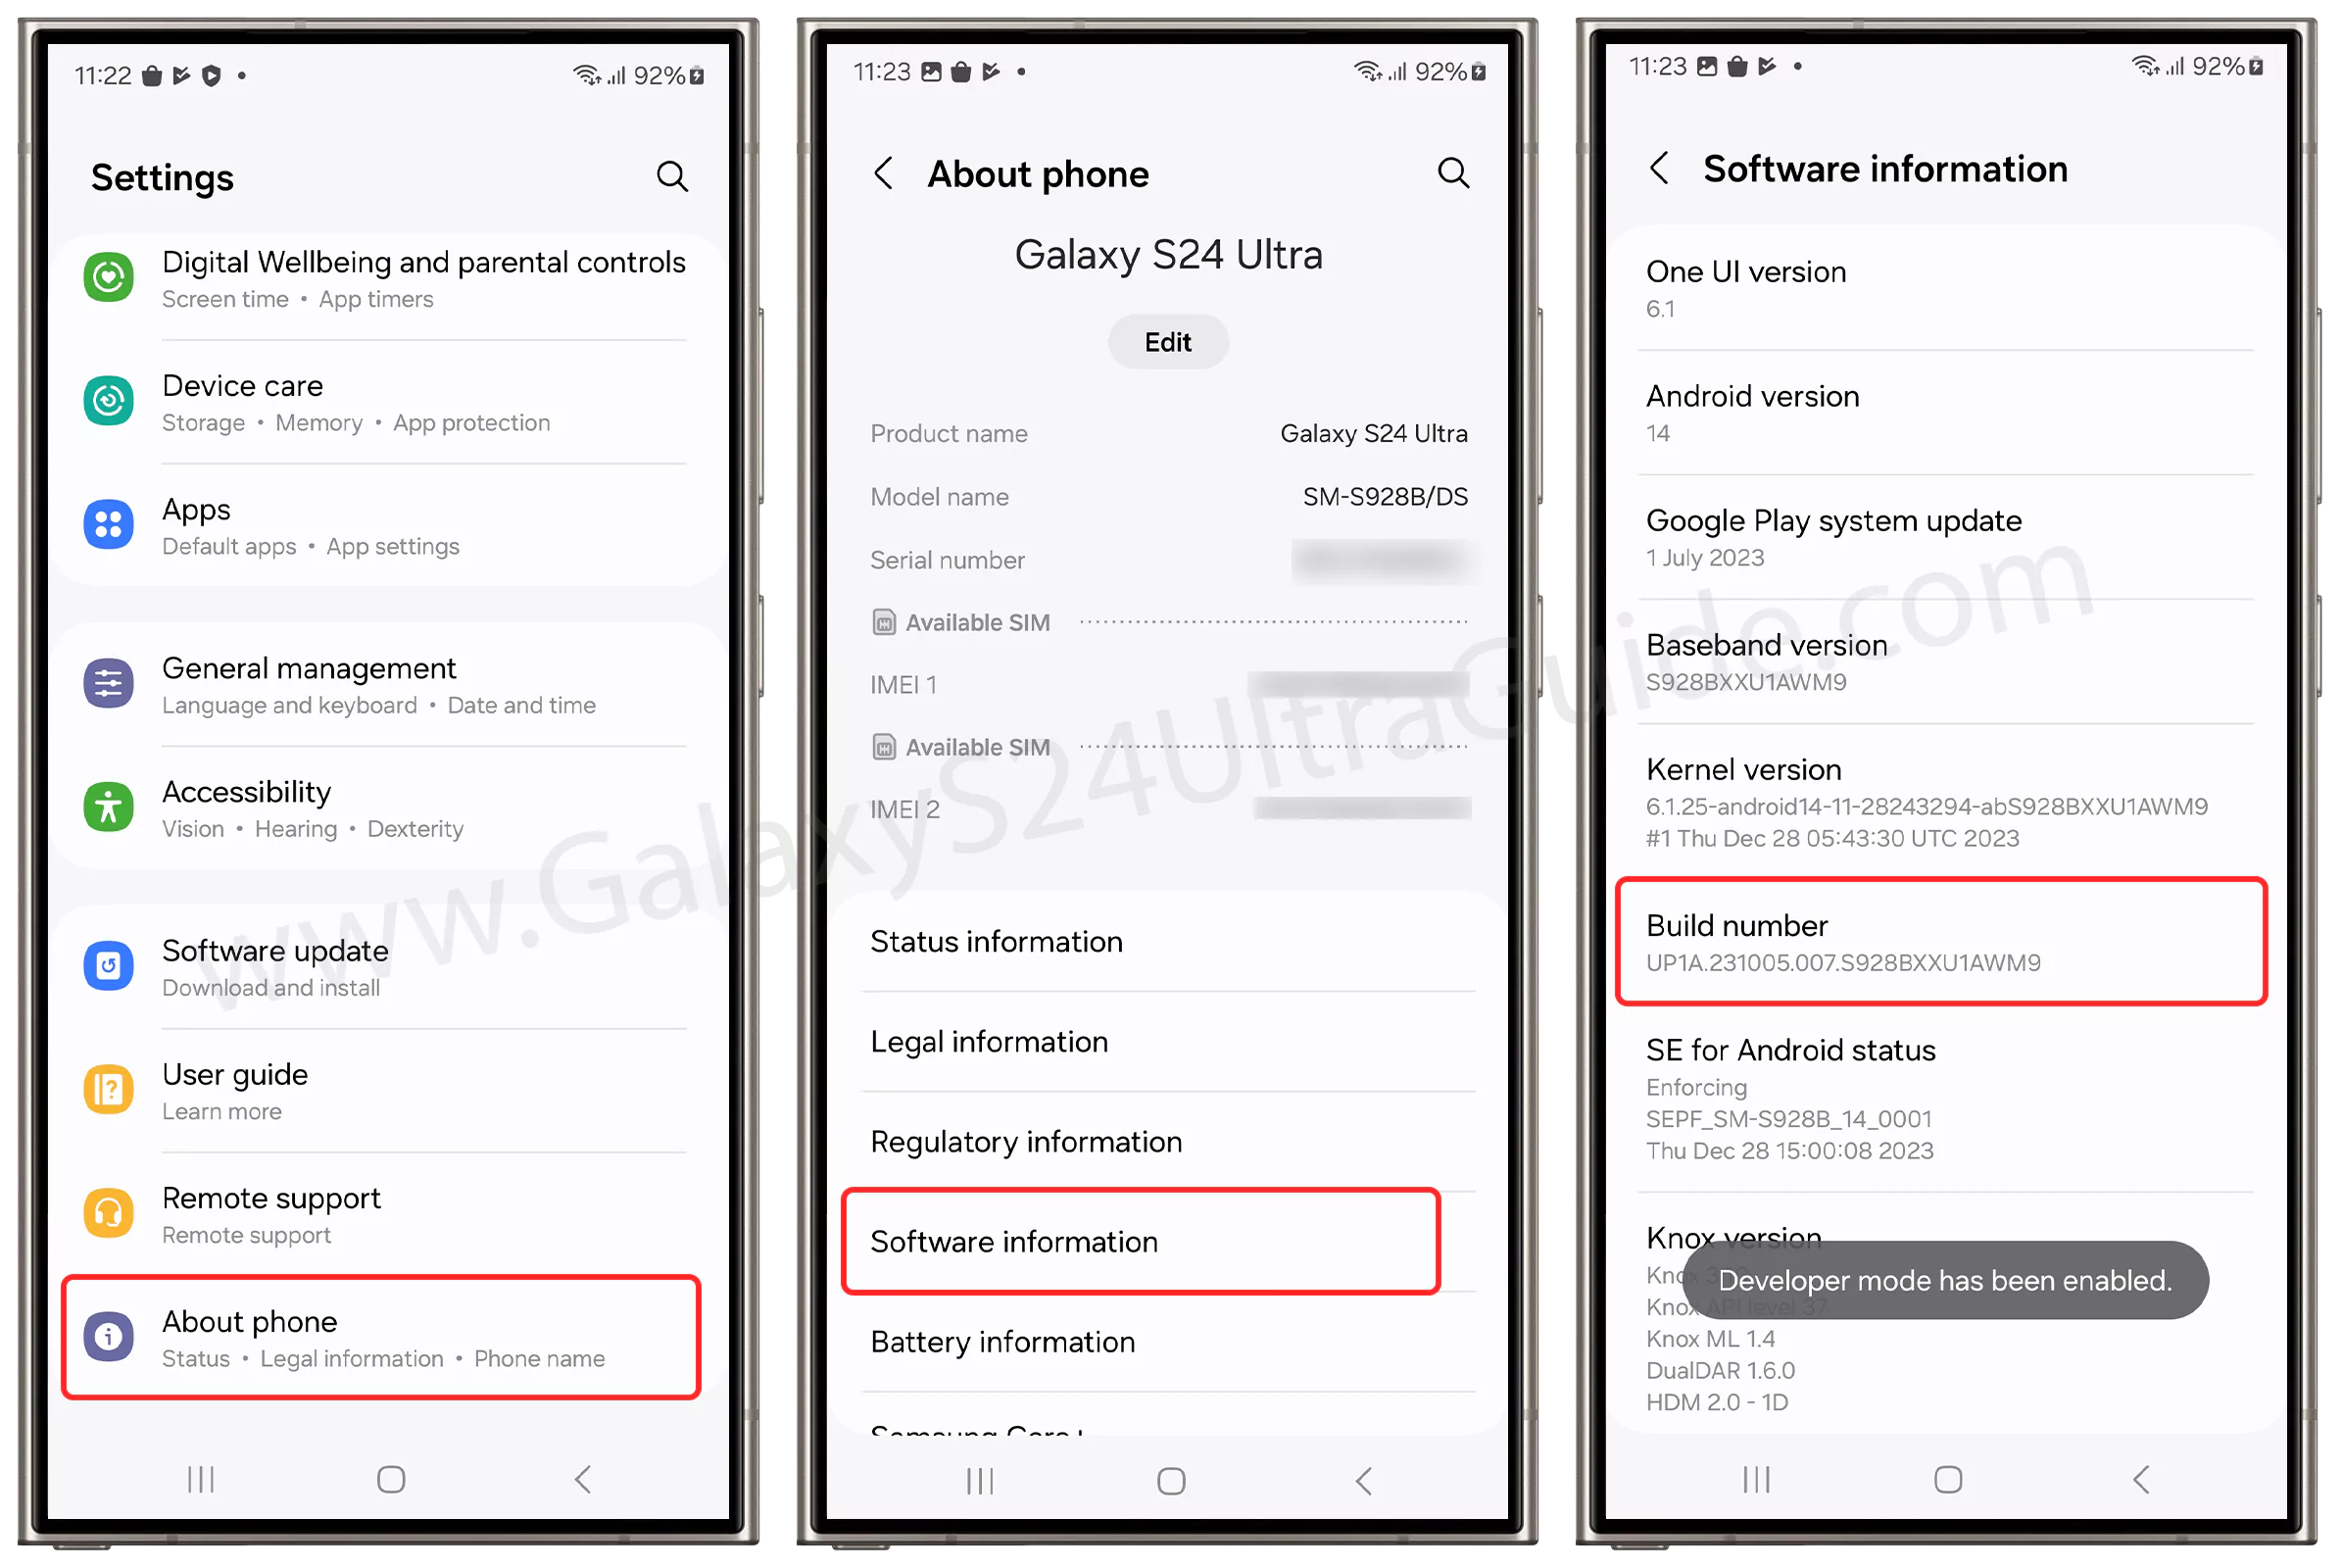
- Open the “Settings” Menu of your Samsung Galaxy S24 Ultra phone.
- Now, scroll down the settings menu and select the “About Phone” option.
- Following this, you need to tap on “Software Information”.
- Next, tap on the “Build Number” more than 5-6 times.
- Enter the pattern or password of your phone.
- In a few seconds, you will notice “Developer mode has been enabled” on the screen.
Enable the OEM unlocking option on Samsung Galaxy S24 Ultra
After completing the developer mode access, it’s important to follow the given steps to avoid any problems in the upcoming TWRP installation procedure.
- Now, access the “Settings” App again.
- Go to the “Developer options” location.
- Finally, enable the “OEM Unlocking” toggle.
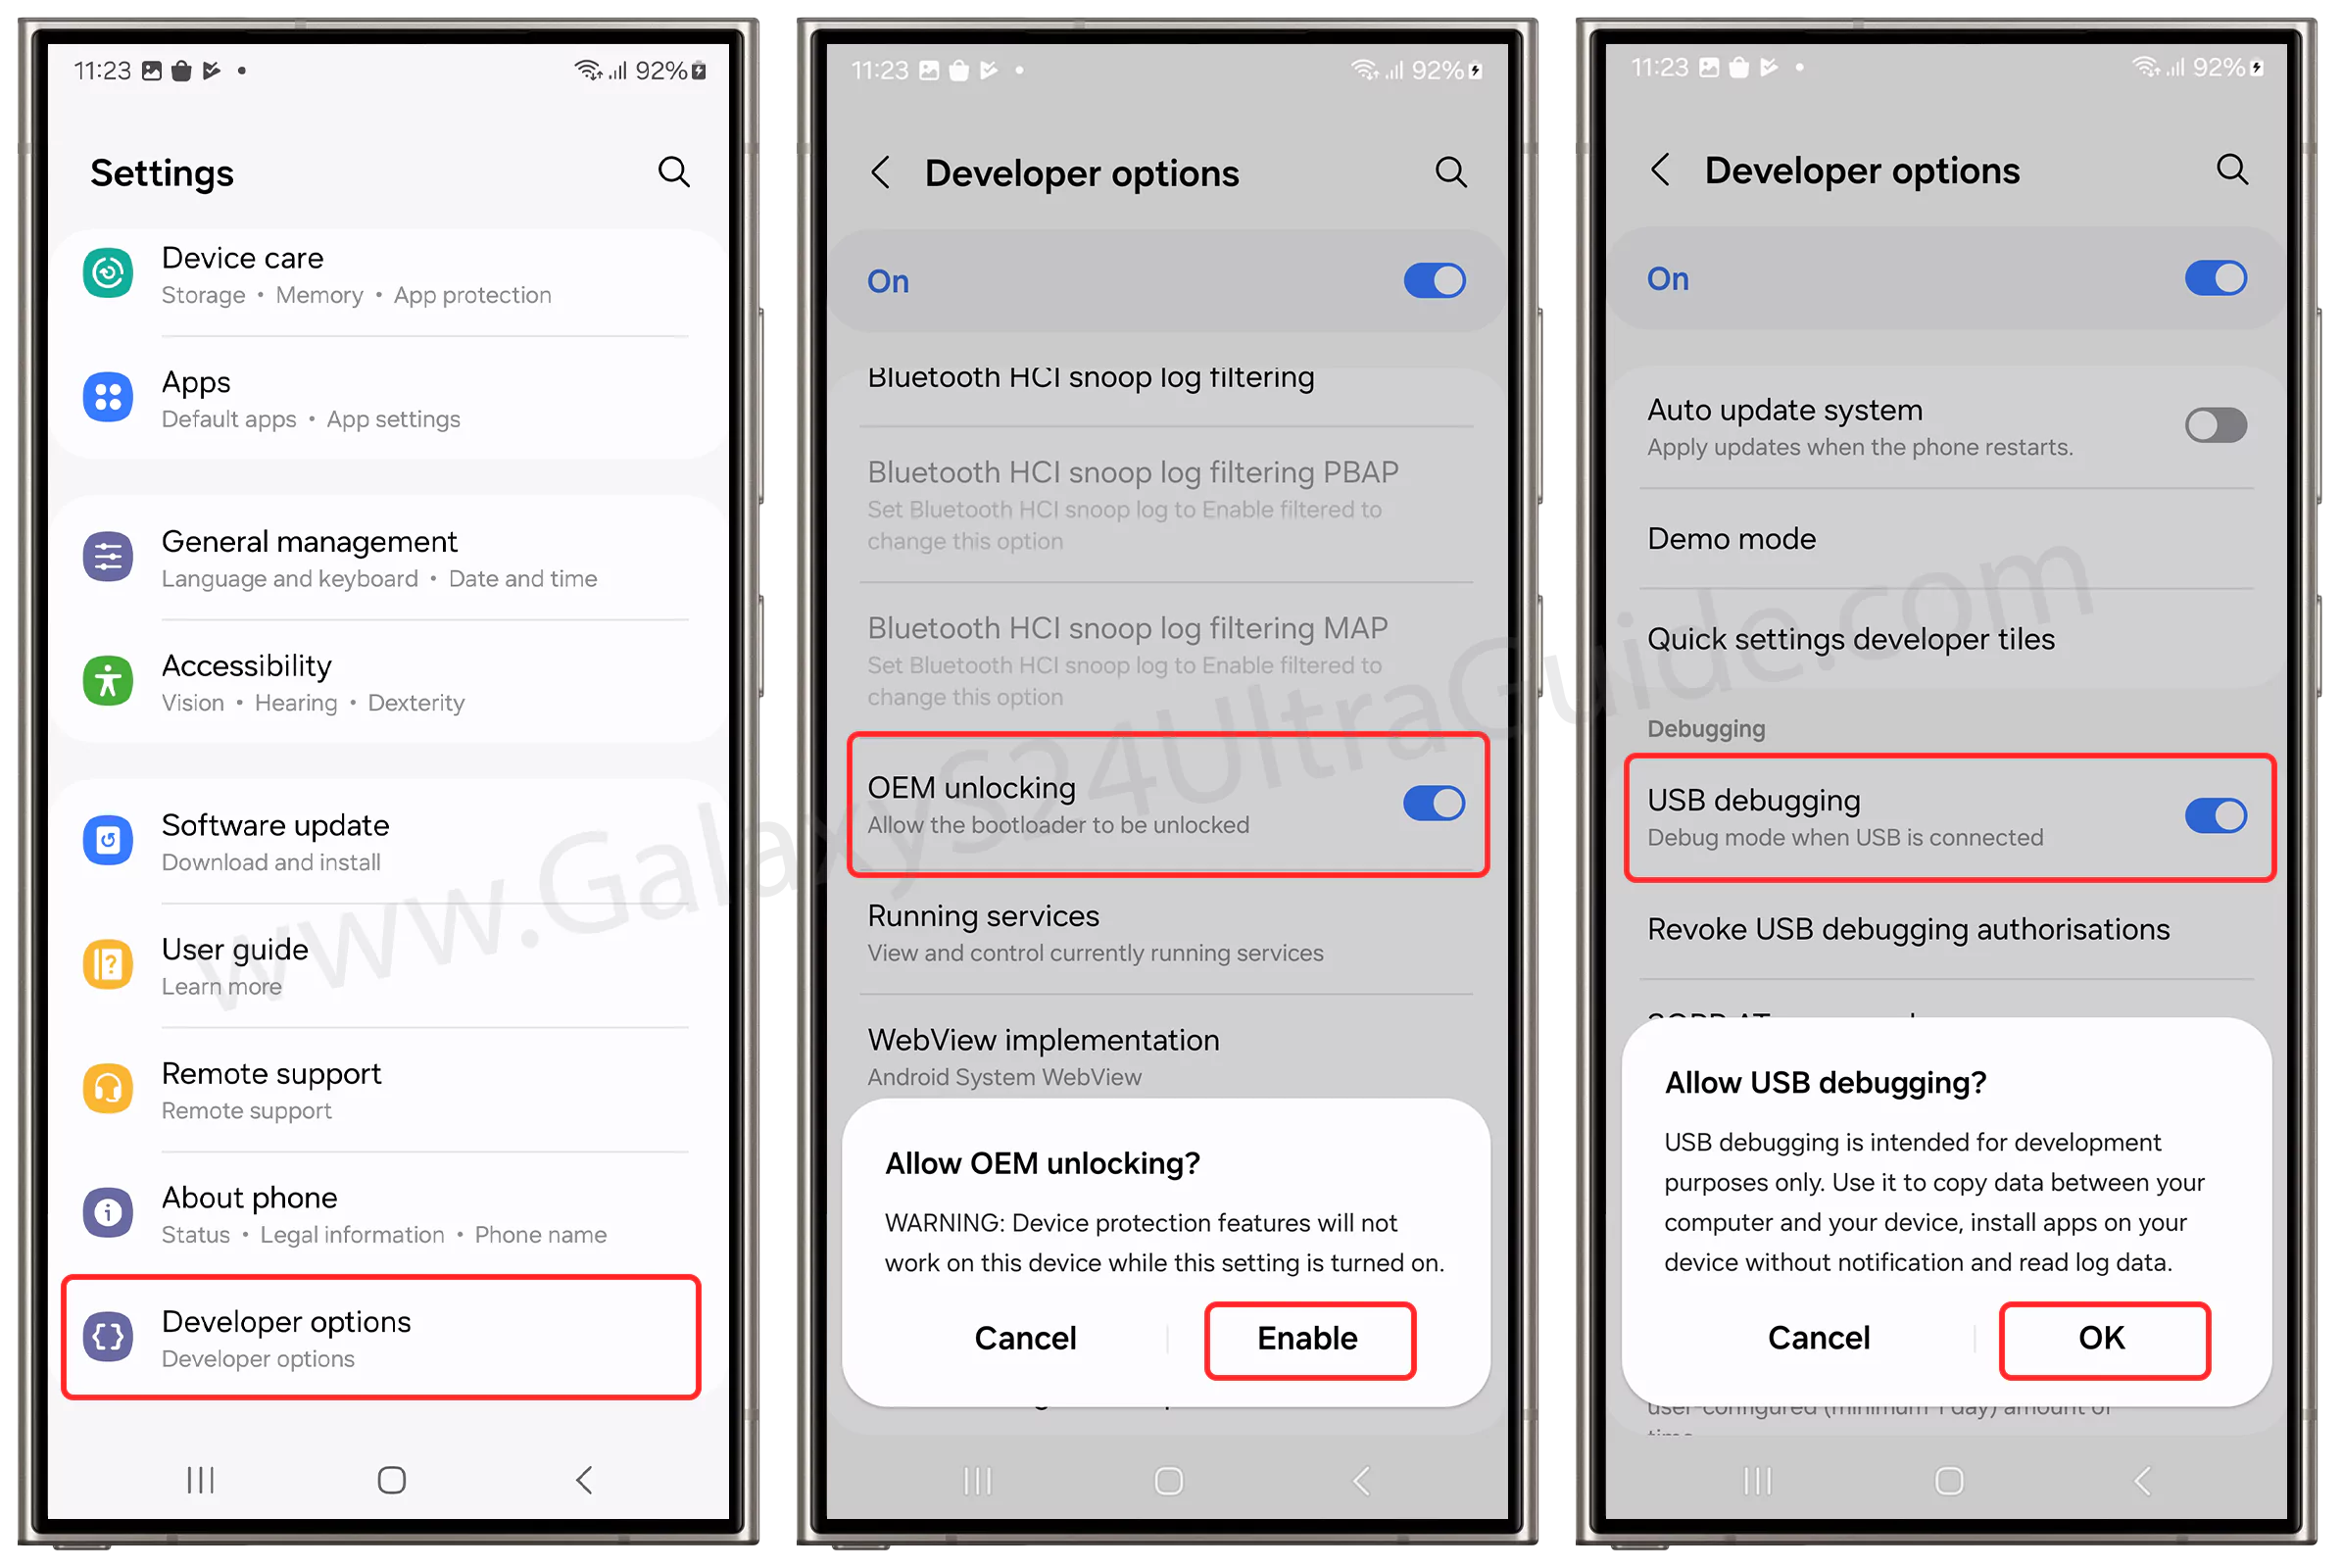
Note: You can also Toggle ON the USB debugging option. (optional)
Unlock the Bootloader
Here, you will understand the entire process to gain access to the bootloader settings on your Samsung Galaxy S24 Ultra device. Therefore, let’s dive into the instructions section!
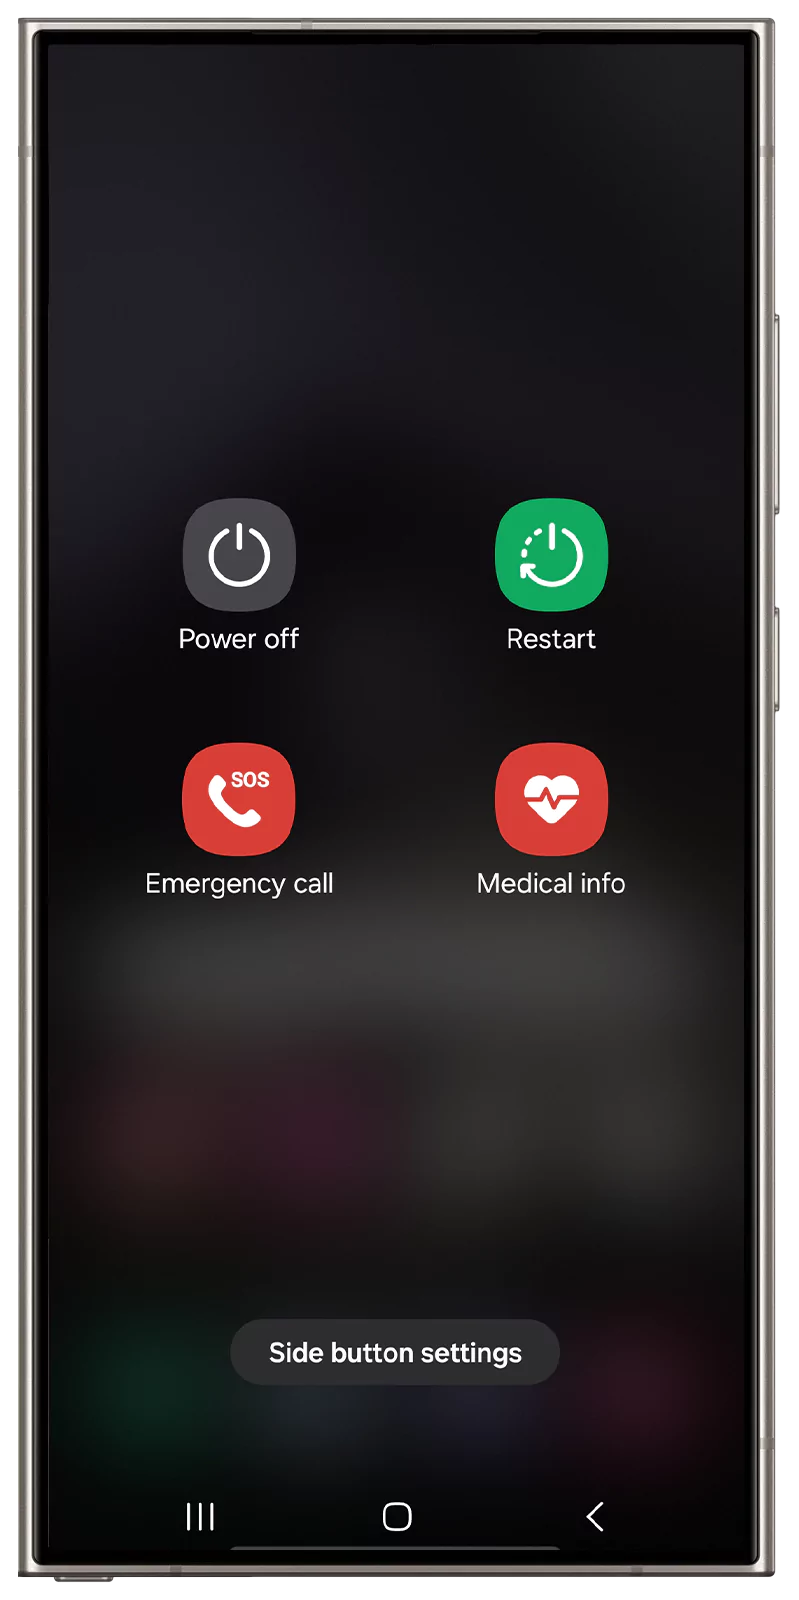
- First, power off your device by pressing and holding “Volume down + Power” button, then select “Power Off”.
- Now, keep pressing the “Volume Up + Down” buttons combination.
- Simultaneously, you need to connect your phone to your PC using a USB cable.
- If you connect your device properly, you will see a “Warning” notification on the screen.
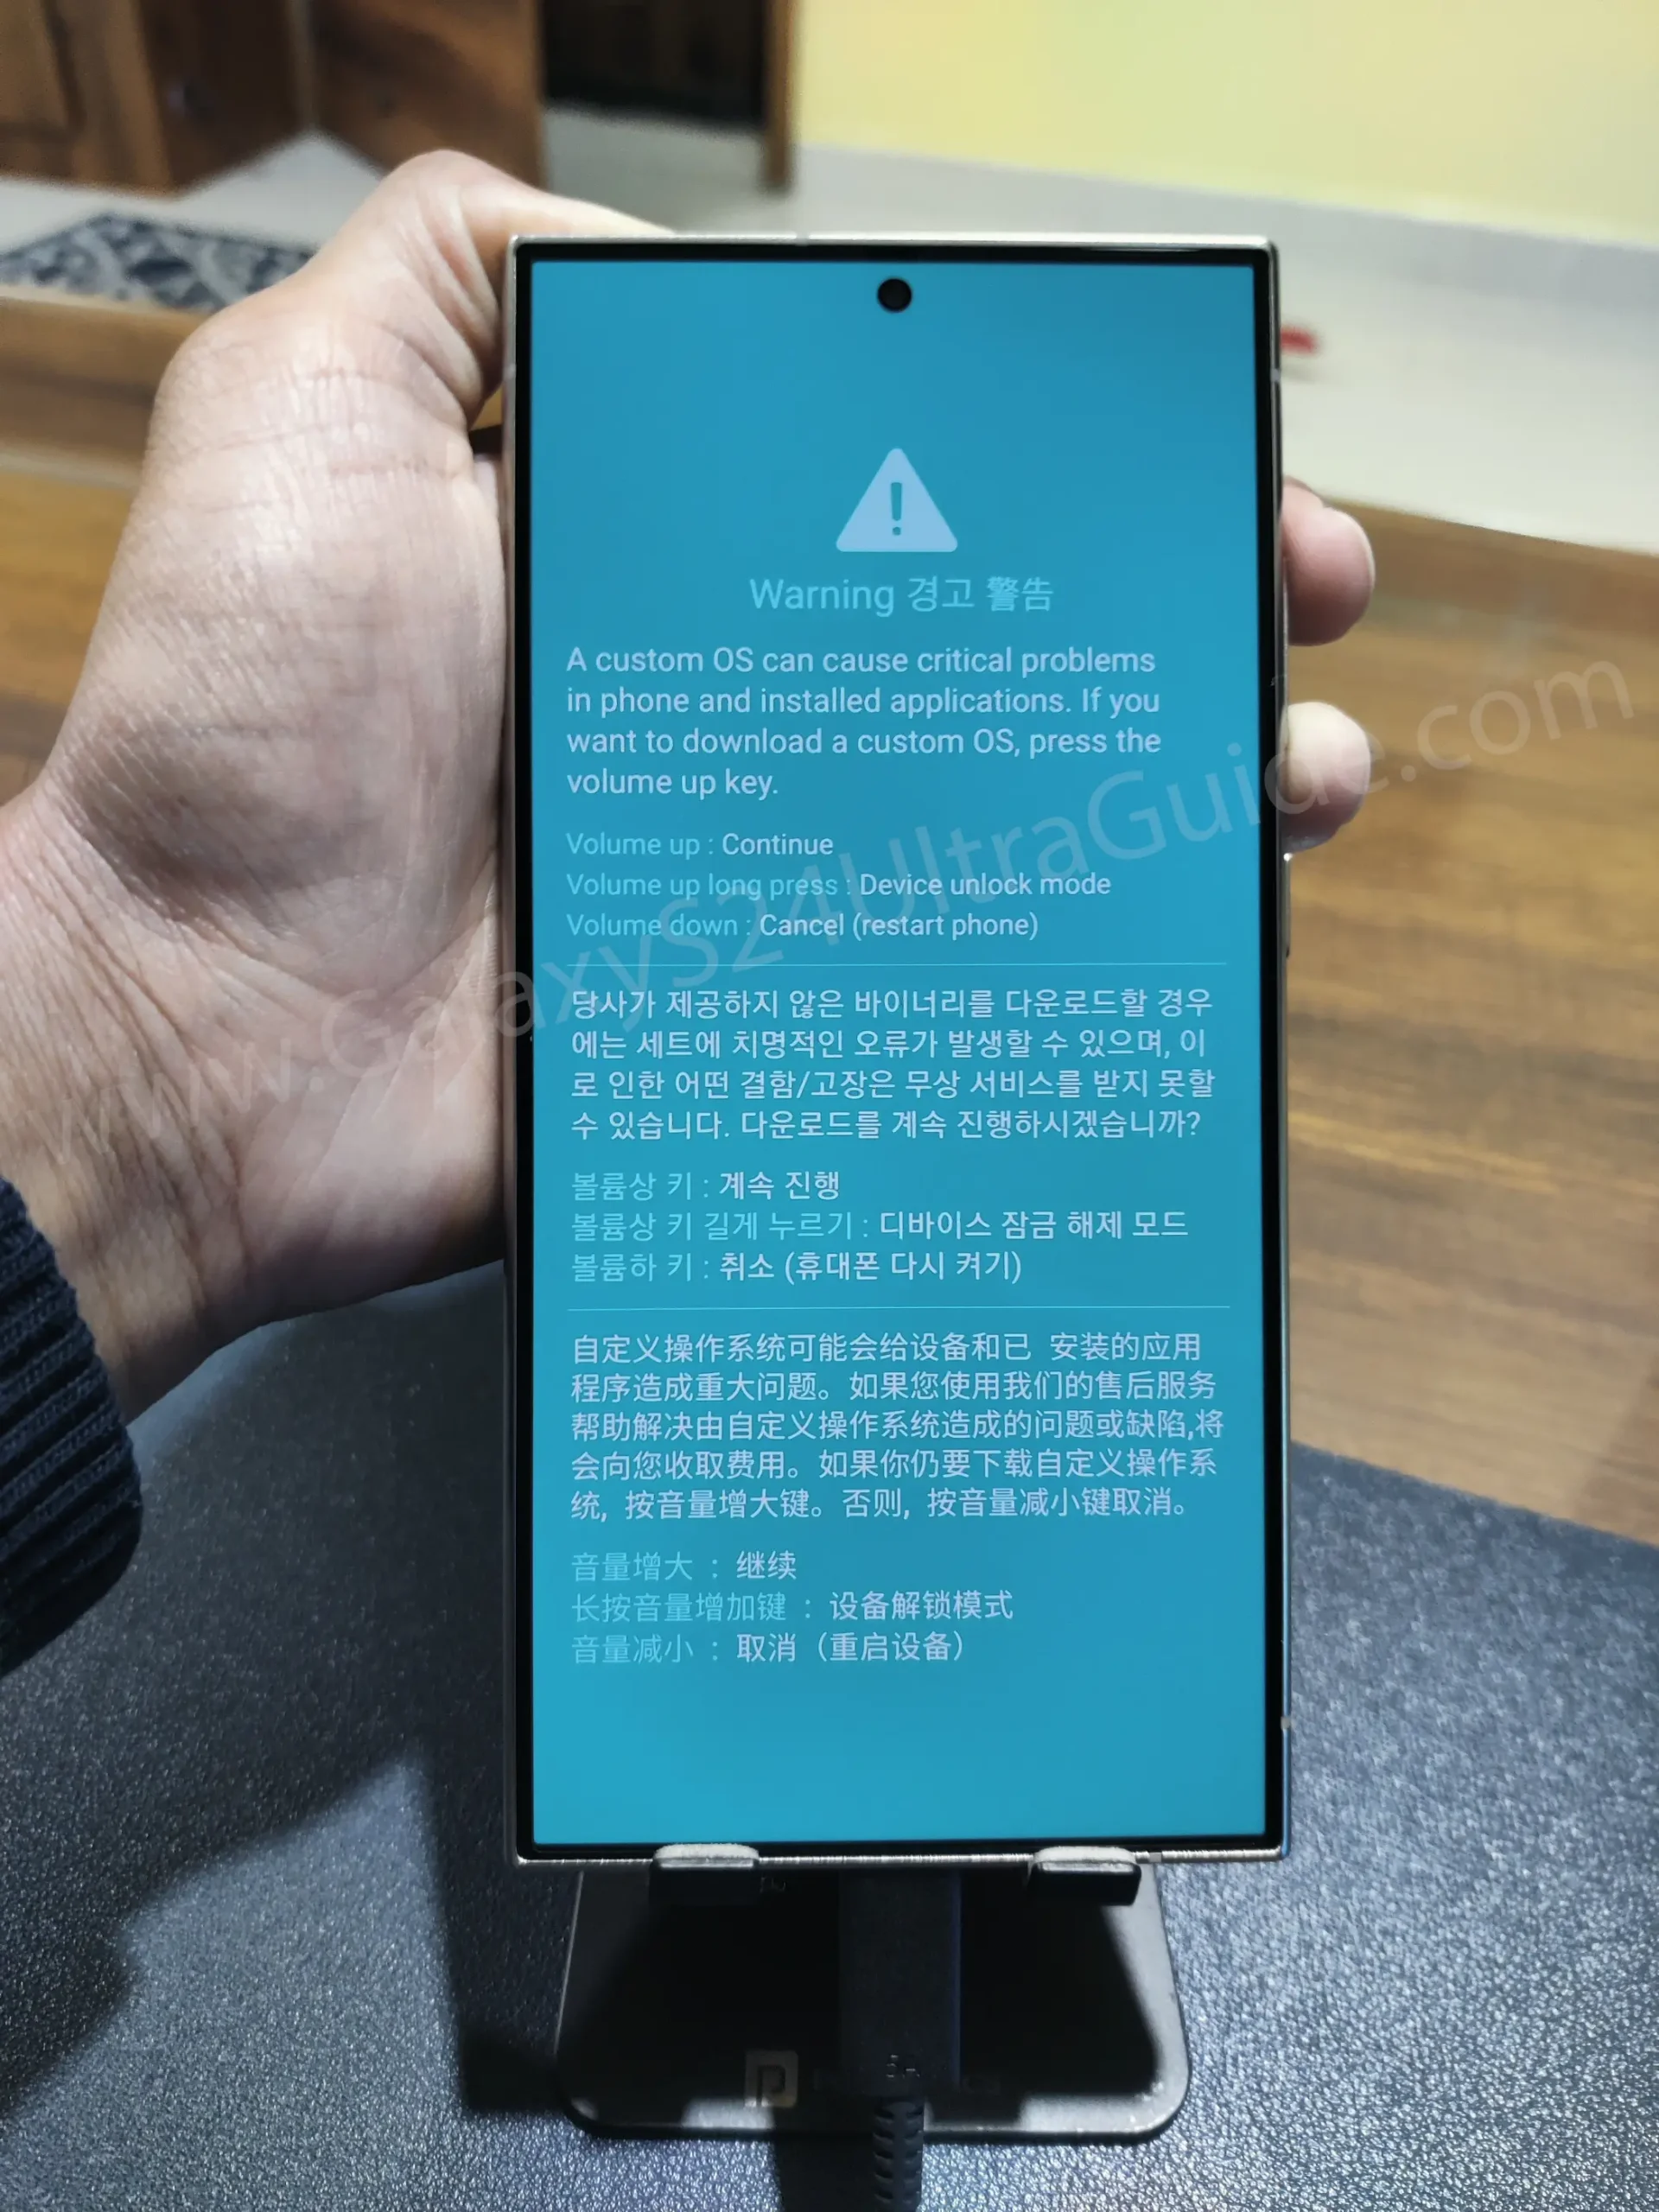
- Then, hold and press the “Volume Up” button for 7 seconds to access the unlock bootloader option.
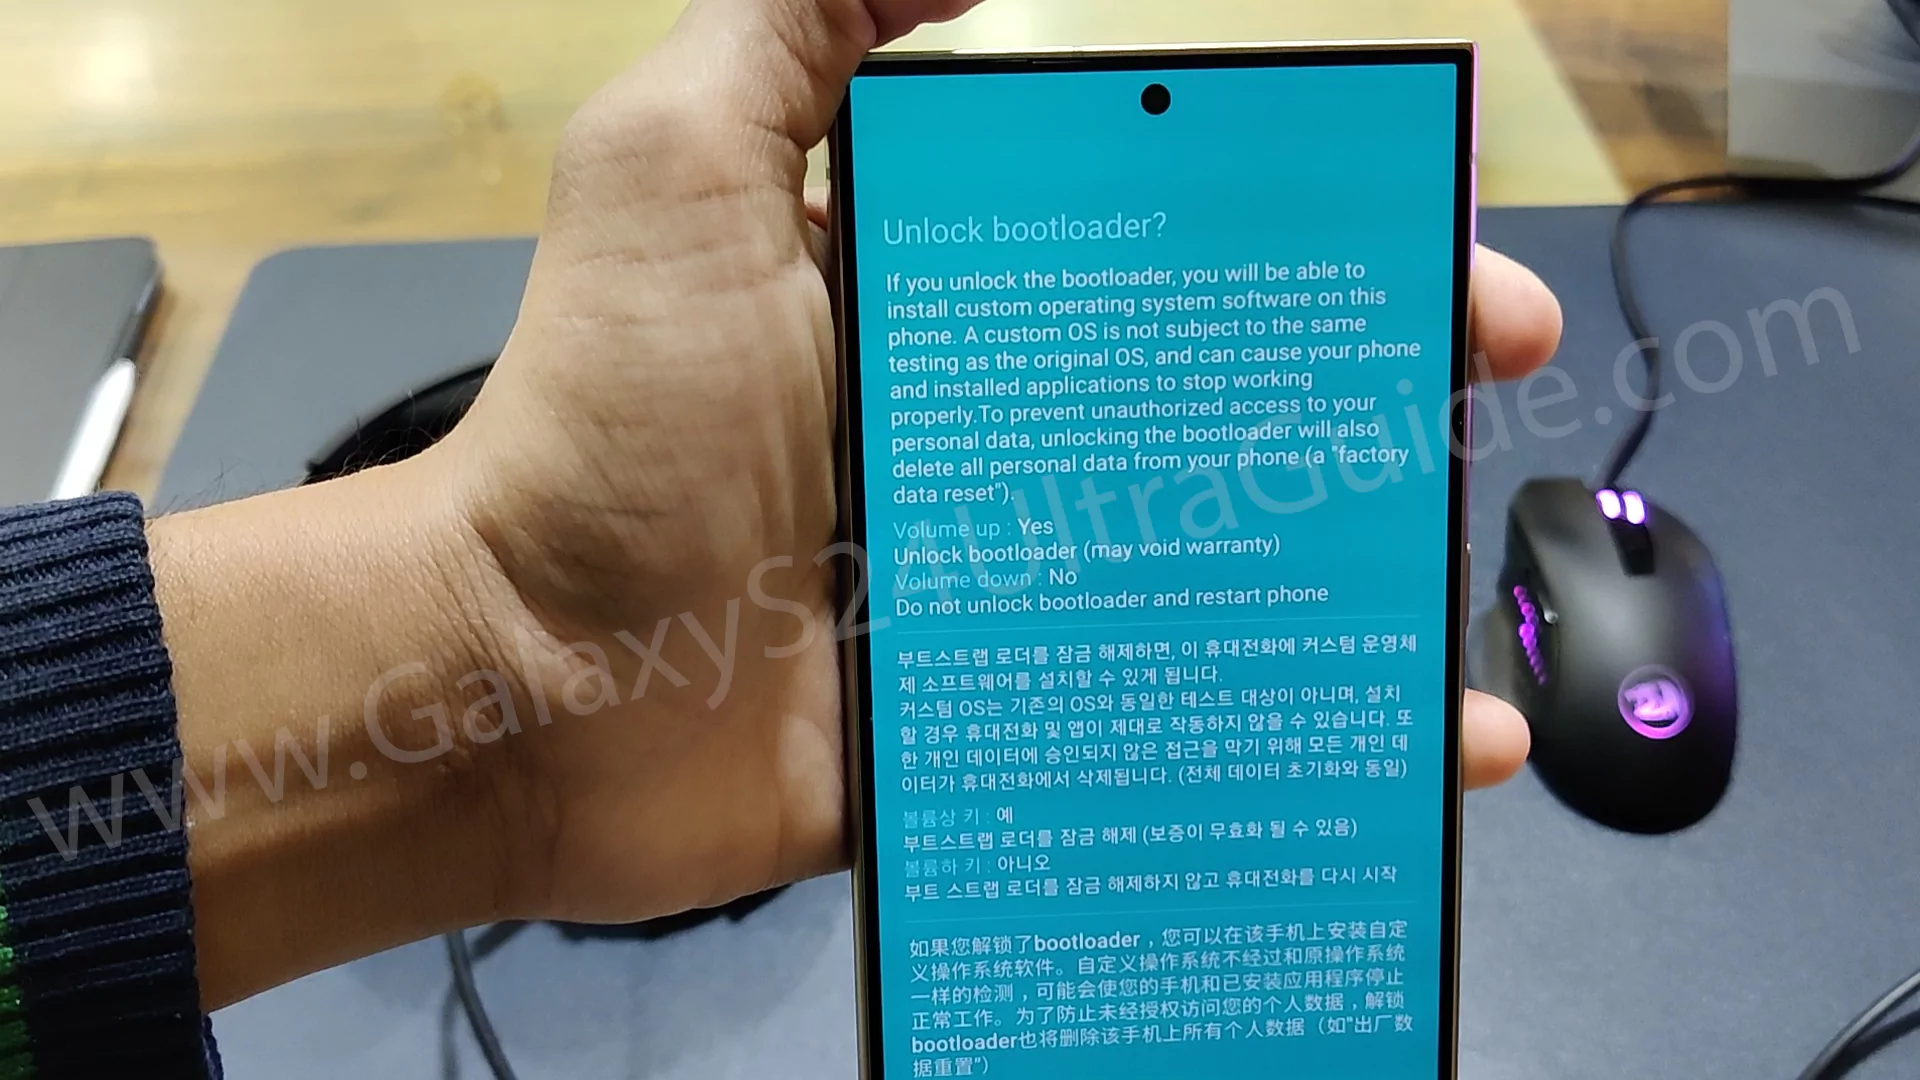
- Lastly, press “Volume Up” button to confirm Unlocking the bootloader.
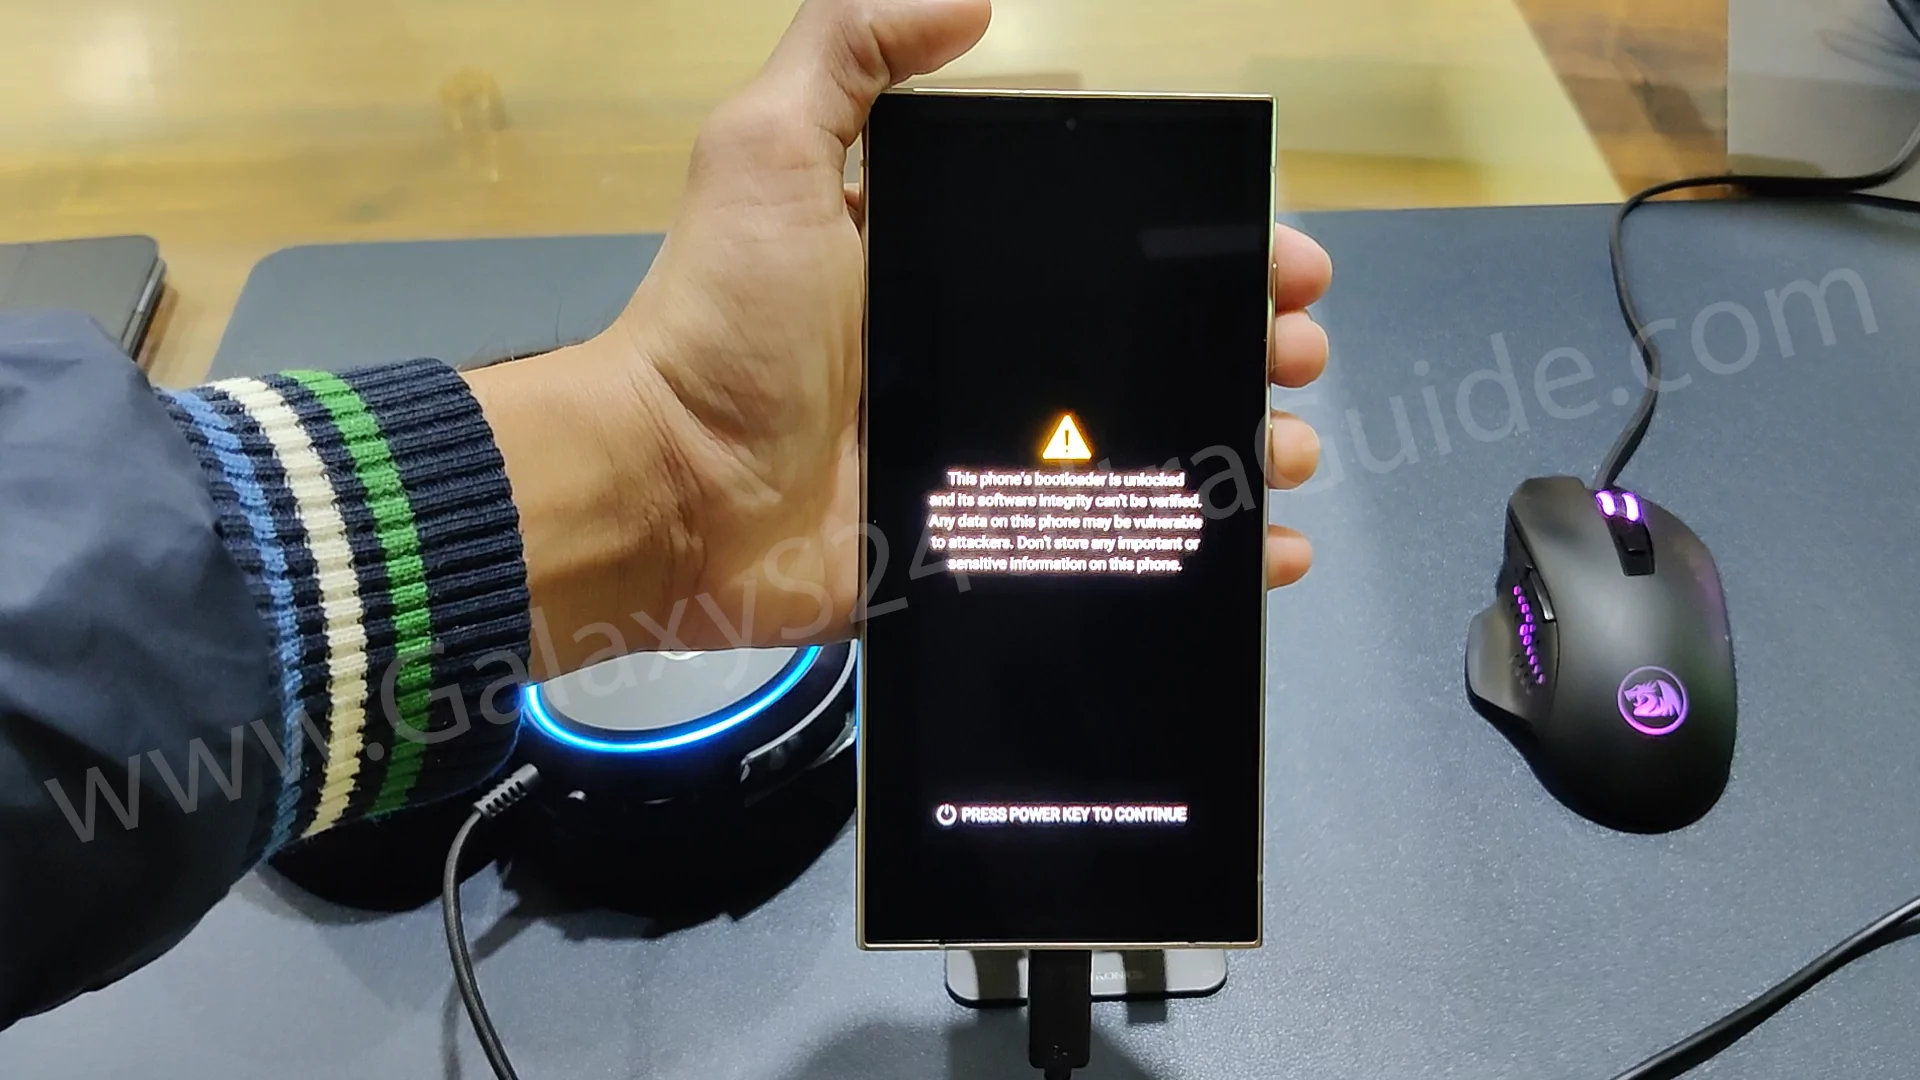
Note: We always suggest readers completely back up their Samsung phones before starting the bootloader unlocking method.
From the above process, you can effortlessly unlock the bootloader on your Samsung Galaxy S24 Ultra.
It’s a crucial step that you should accomplish if you want to install TWRP on your device. Once you finish this guide, your device will be ready to take the next step.
Enable Download Mode on Samsung Galaxy S24 Ultra
Here, you will learn the step-by-step guide to put your Samsung Galaxy S24 Ultra in the download mode. Generally, this mode is utilized as a bridge to connect your device to the Odin tool.
It also plays an important role when it comes to installing TWRP or flashing firmware files on your device.
Thus, ensure that your device is ready to access the developer mode, and follow the next steps carefully!
- Press the “Volume Down + Power” button to Power off your phone.

- Long press the “Volume Down + Power” button and connect the phone to the PC through a data cable.
- You will see the bootloader “Warning” screen.
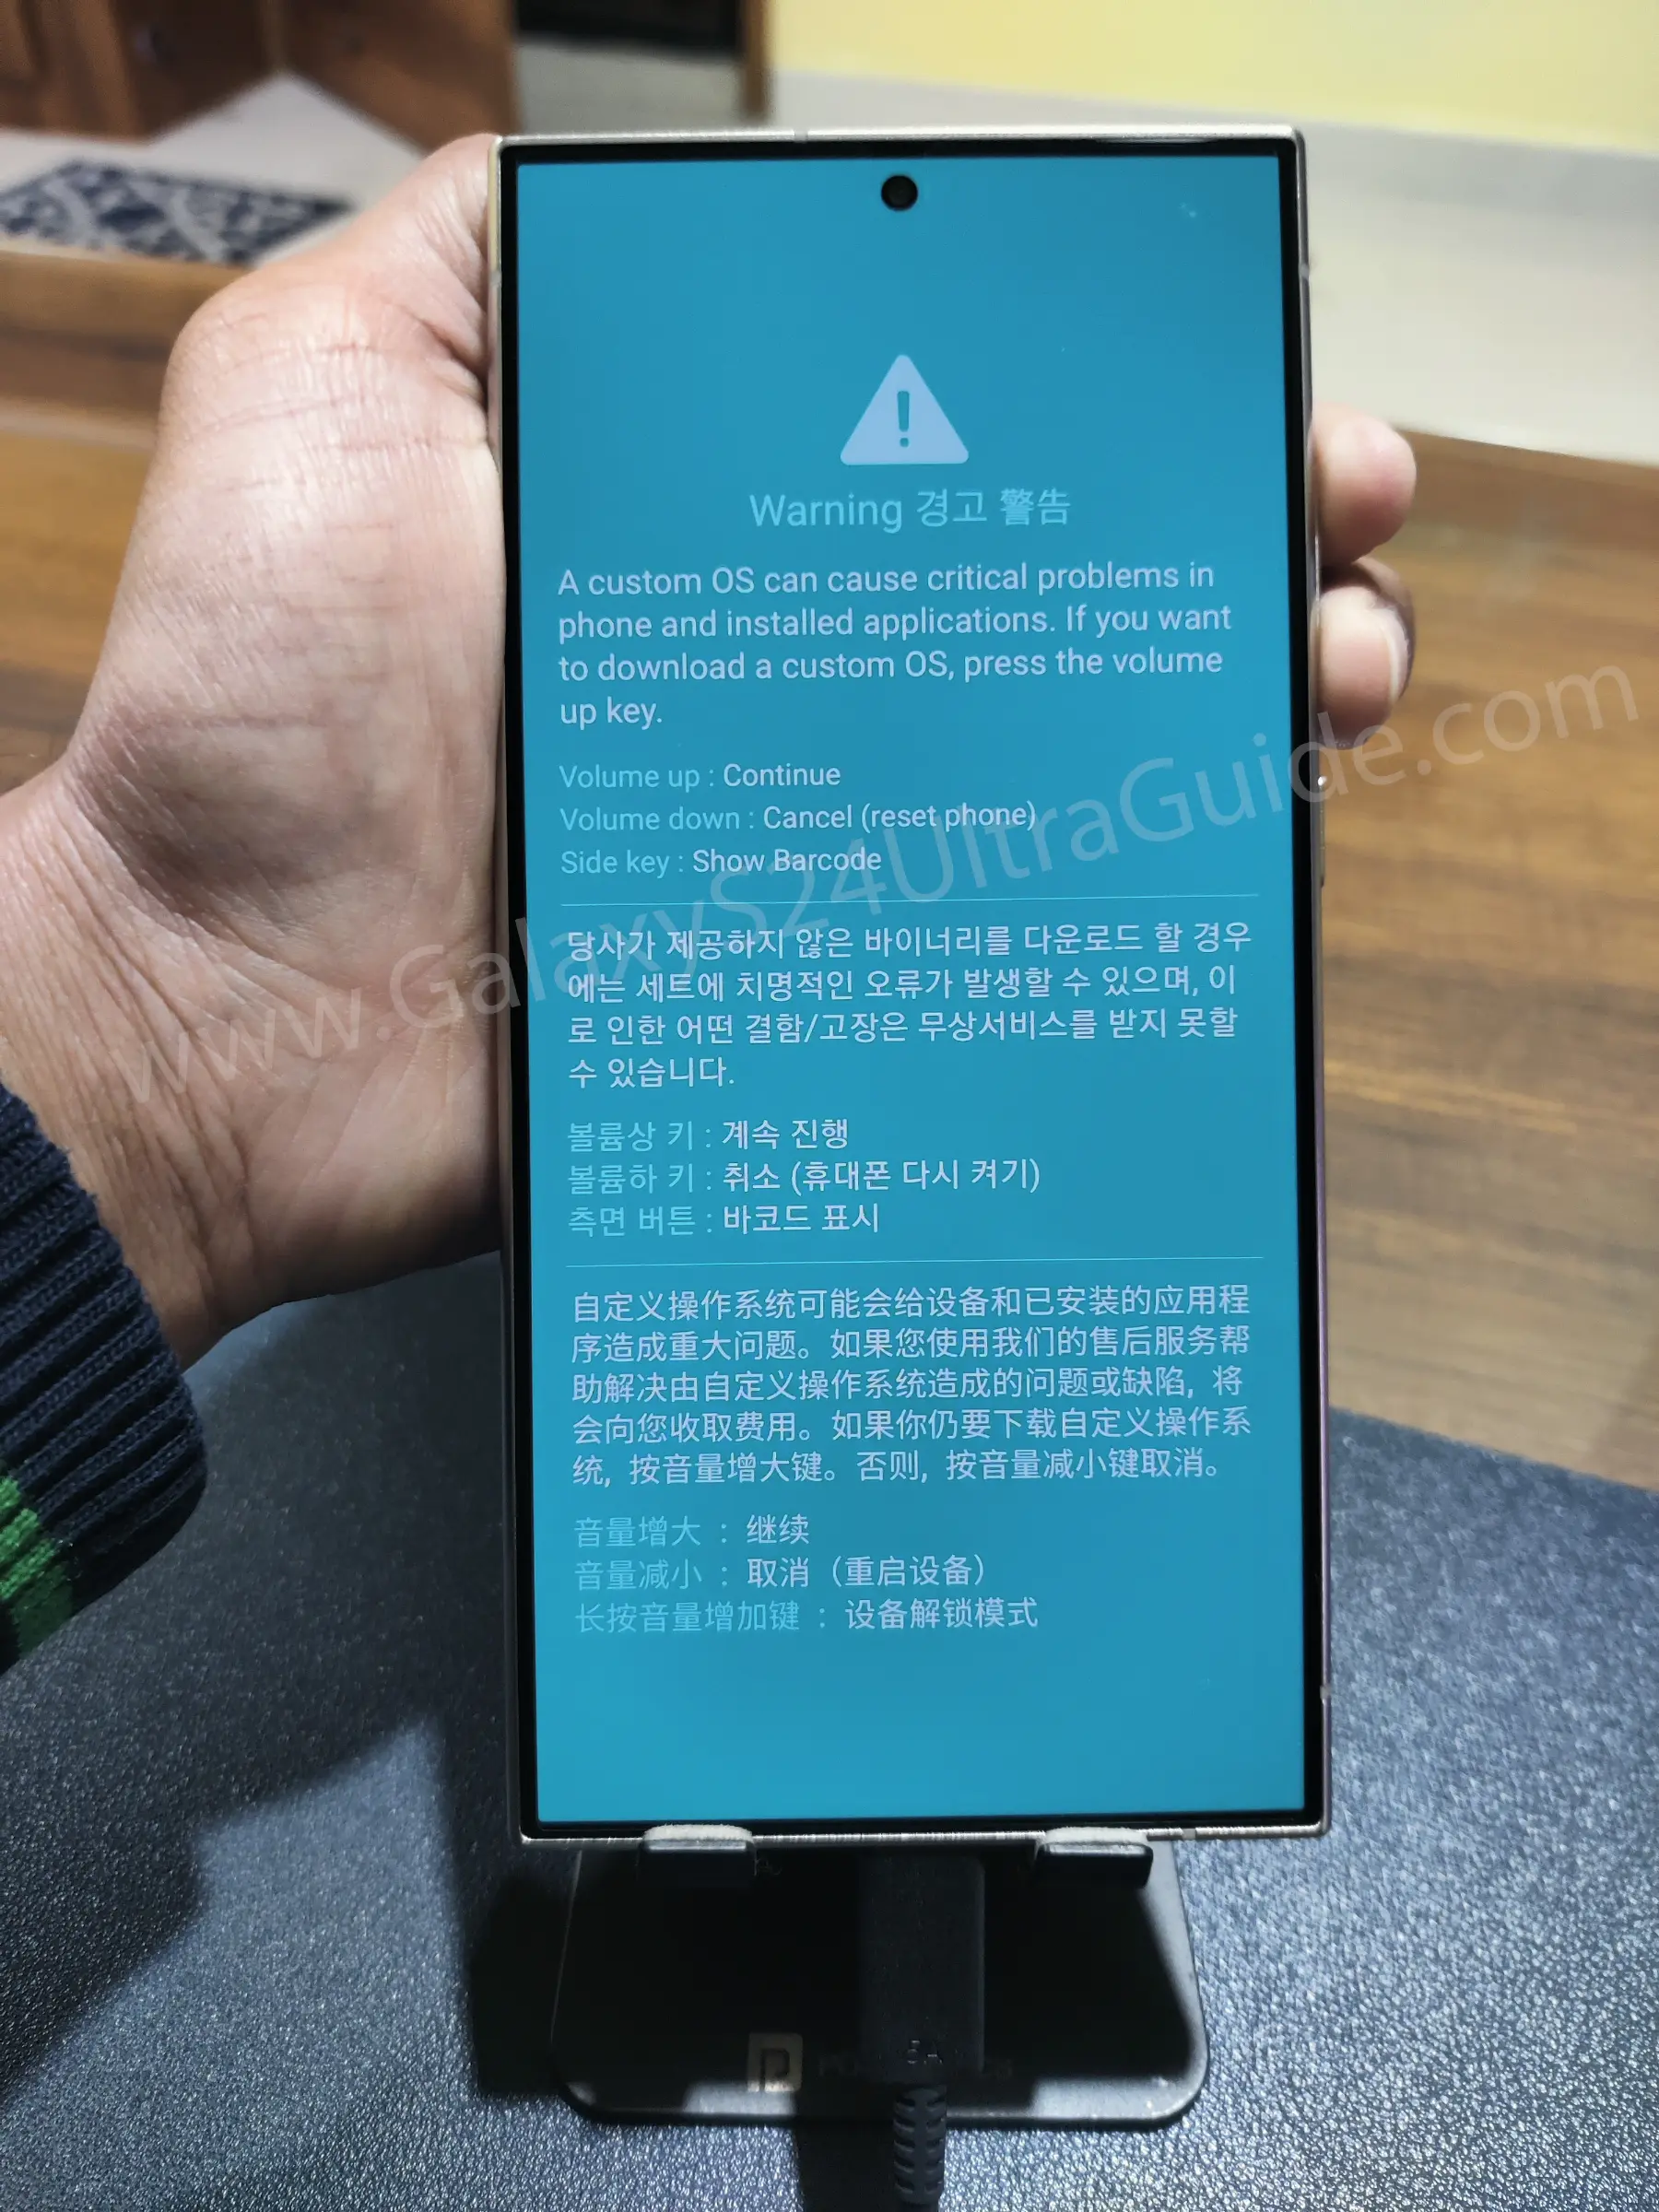
- Simply, press “Volume Up” to access download mode.
- With this, your Galaxy S24 Ultra device will enter into the Download Mode.
Required Files for TWRP Installation
If you desire to install TWRP recovery on the Samsung Galaxy S24 Ultra, it would be great to download the following resource files. Usually, you need the TWRP file, vbmeta, and Disable DM verity Force Encrypt files for the upcoming process.
Through them, you can successfully flash custom recovery and unlock the hidden potential of your device. Make sure to get these resources before diving into the TWRP installation guide.
Download Odin Tool (On PC)
Download TWRP for Galaxy S24 Ultra (On PC)
Download vbmeta.tar file (On PC)
Download the Disable Dm Verity Force Encrypt for Samsung (On your Phone)
Installing TWRP Recovery on Samsung Galaxy S24 Ultra
We are assuming that you have already downloaded the necessary resources from the above section. Now, let’s see the actual installation process of the TWRP recovery for the Samsung Galaxy S24 Ultra below:
Step 1: Flash Vbmeta File
- Launch the Odin Tool on your computer/laptop.
- Connect your device to your PC in the download mode.
- Go to the vbmeta.tar file location and load it in the “AP” section Odin.
- Then, press the “Start” button that appears on the screen.
- Again, reboot your phone to the download mode.
Step 2: Flash TWRP file
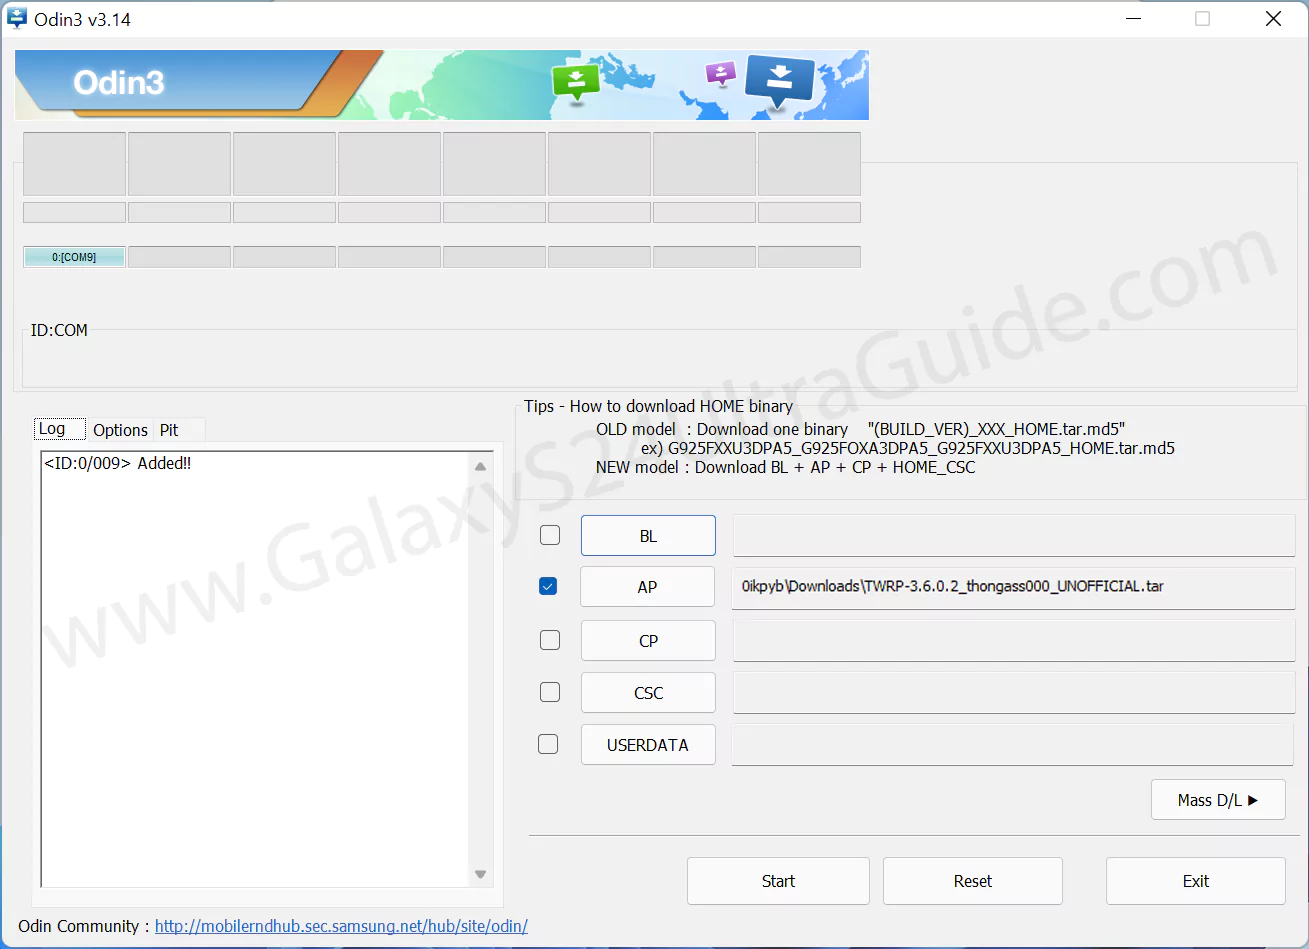
- Click on the “AP” file section and navigate to the TWRP location.
- Once you have selected the TWRP file, click the “Start” button.
- After the flashing ends, immediately press the “Volume Up + Power” button.
- Keep pressing both of the buttons until you see the “Boot Warning”.
- Now, press the “Power” button to access TWRP recovery mode.
Note: You need to store the Disable DM Verity Force Encrypt file in your Samsung Galaxy S24 Ultra internal storage. You can transfer this file directly from your PC if you have already downloaded it from the above section.
Step 3: Flash the Disable DM Verity Force Encrypt File
- Make sure to access the TWRP recovery mode.
- Now, click on the “Install” button to appear on the home screen.
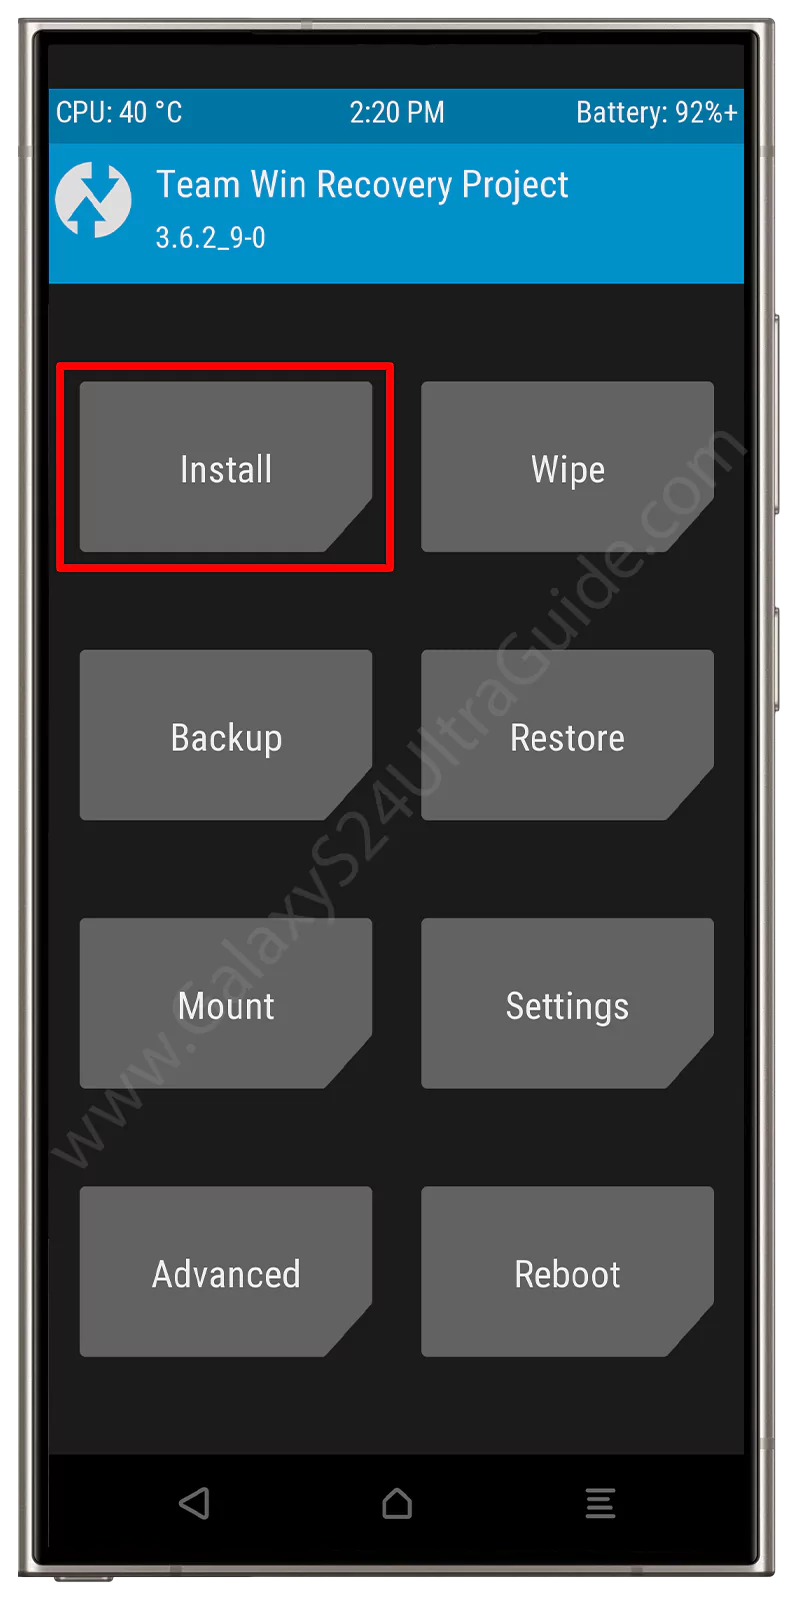
- Go to the “Disable DM Verity Force Encrypt” file location.

- Select the file and flash it by swiping right.


- Next, go to “Wipe” → click on “Format Data”.

- Finally, reboot your phone or apply other modifications.
From the above guide, you will effortlessly install TWRP on the Samsung Galaxy S24 Ultra. Now, if you are interested in rooting your device, follow the next part!
How to Root Samsung Galaxy S24 Ultra?
After complete installation of TWRP recovery, you can proceed with the Rooting Samsung Galaxy S24 Ultra via Magisk. There’s no doubt that rooting will provide complete control of your device and offer the power to modify the interface. If you want to unlock your phone’s true potential, follow the instructions from our guide.
Follow up: Guide to Root Samsung Galaxy S24 Ultra using Magisk
Wrapping Up
We covered the important resources and necessary steps so that you can install TWRP on the Samsung Galaxy S24 Ultra with no worries. With our step-by-step guide, you can unlock the bootloader, access download mode, and flash the TWRP recovery file.
But make sure to cautiously follow each step to avoid any trouble. In the meantime, if you have some queries, please let us know in the comment part.